
I feel like a self-promoting shill, but I don’t think I can add additional photos to an existing thread. Sorry.
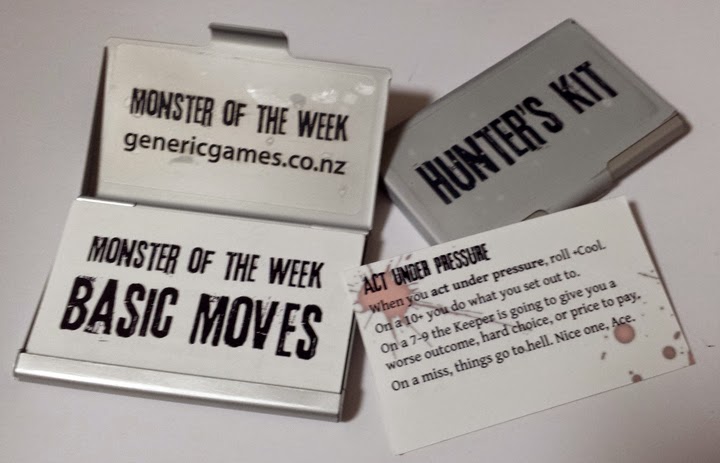
Here’s an updated shot of the Hunter’s Kits I’m working on for my #Gateway2013 Monster of the Week game. You can see both the inside and outside of the metal case, and the front and back of the play aid cards.
The case on the left is my test case. I tried to pick it up well before the clear sealer dried, hence the ugly finger prints on the inside cover. The real kits won’t have that as I’m going to be a lot more careful.
I tried hitting the cases with some coarse grit sand paper to see if that would distress the text a bit more. It didn’t, but fine grit sand paper (180 grit) did take down the “dusty” feel that the spray sealer left. I also tried using a Tamiya Weathering Kits (the kind that looks like a make up compact and is used for model tanks and what not) to apply some soot and rust effects. That didn’t work at all, as the stuff doesn’t stick to the clear label. It just looks weird and leaves a dirty ring around the label (this is why you always make a test copy).
I didn’t put any bullet hole or scratch effects on the label. As I ca’t get the label all the way to the edge of the case (it would peel off too easily that way) I thought it would look weird to have scratches that did’t go all the way to the edges. Plus I thought it would obscure the text too much. Maybe next time I’ll try hitting the case with a “rust effect” spray before putting the clear sealer on them. The kits look slightly distressed, but I’d like them to look really beat up.
What a fantastic idea. They’re business cards, right? … But the other way to do it would be to put them in a wallet, so they look a little like fake IDs that you can flash to the other players.
for distressing text it would depend on what you applied it with. You could use a polishing bit on a dremel or some asytone for many paints. I would do that though before applying a matte clear coat. I know an iron nitrate solution heated up will color most steels to a rust color, but that tends to color the whole piece and the heat can ruin your temper or warm the metal. If you go that route you’d definitely would want to do paint afterwards which could be tricky since the surface might not be smooth at that point. So if you want a subtle rust effect and the steel isn’t stainless I’d probably just distress with with a few rounds of water. I’m not positive, but I think salt water speeds up the process and might even effect stainless steel (I’m really not sure about that).
Yup, they’re business cards Steve Hickey. 91mm wide by 55mm high. A wallet-type case would be cool, too. Although I’m focusing on just the Basic Moves right now, I am thinking about trying to condense all the Playbooks into business cards as well. Then I could see a leather wallet with a window on the front, like for IDs. The front would say “The Chosen” or “The Mundane” while the inside would have pouches for both the Basic Moves and the relevant Playbook Moves. Then you could flash your “wallet” and everyone would know what type of Hunter you were. That’d be more involved than what I’m doing now, but I’m learning leathercraft, and so is doable. Thanks.
Thanks for the advice, David Rothfeder. The text on the cases is actually a big, clear sticker that I ran through my inkjet printer and then cut to size. The ink is on the top side of the label, meaning it smudges if rubbed really hard. That’s why I tried the clear matt sealer; to protect from smudging. That’s why I thought the sandpaper would distress the text somewhat. I figured that a course grit would scratch off sections of the ink and/or label, giving it a weathering effect. Maybe the sealer did it’s job too well. I’ll have to experiment by using the sandpaper before applying the sealer next time.
The cases I’m using are aluminum (they were cheaper) though I did see the exact same design in stainless steel. I’m not sure if the iron nitrate solution works on aluminum, and honestly I have no idea how to procure those chemicals here in Japan. I think paint effects (like a textured or crackle paint) laid down after applying the clear label but before the matt sealer might be the way to go.
Iron nitrate probably would not work on aluminum. In fact aluminum doesn’t actually ‘rust’. Aluminum actually rapidly oxidizes when exposed to air, meaning all aluminum we encounter is actually coated in it’s oxidation (which happens to be mostly clear. It also happens to be essentially the same material as rubies and sapphires). There really isn’t going to be much that you can do to stain it. (BTW I think I got my chemistry wrong on the rapid rusting)
Thanks David Rothfeder. So paint distress effects before sealing it are probably my best bet.
I wanted to ask, is the text in Monster of the Week Creative Commons, Michael Sands?
No, it’s not creative commons. However, I hereby give you permission to distribute the files for these cards however you want.
Awesome! Thanks, Michael Sands!
Would an etching kit work on aluminum? You might be able to get one at a craft store or online.
But I really love these. Great job!
I never even considered an etching kit. Thanks for the suggestion, Sarah Richardson . It’s a bit advanced for me, but it’s something to look into.